Thursday, September 29, 2011

Lesson #17: Soft Pumpkin Cookies

Fall is my favorite time of year! Every year, I get really excited to start making my favorite fall desserts and pumpkin is one of my essential fall baking ingredients. First up are these AMAZING cookies.  I've made other versions of pumpkin cookies (including one that received a 1st place ribbon at the county fair in Arizona), but I think I've found a new favorite :)

These cookies are incredibly soft & fluffy and are rolled in a sugar/spice mixture. When you bake these, there are two things to keep in mind. First, make sure you leave enough room between these cookies when they bake - unless of course you want a giant cookie! Second, the cookie dough need to be chilled so you can roll them into balls and coat them with the sugar & spice mix. 


LESSON LEARNED: Keep trying different recipes because you might find a new favorite!

Recipe for Soft Pumpkin Cookies

Tuesday, September 27, 2011

Lesson #16: Sweet Wine & Lavender Shortbread

This recipe caught my eye because the combination of lavender and sweet wine in a cookie is something I have not seen before. I was curious about how these flavors would taste together, so I decided to make these cookies. I'm always up for trying new things and was positively surprised by the results!

First, I made a lavender scented sugar by combining lavender leaves (which I purchased at World Market) and sugar in an airtight container. I let this sugar mixture "hang out" for a week and I was ready to go. When I was ready to make the cookies, I opened up a bottle of Reisling (a sweet white wine) and I was all set to make these cookies!

These buttery cookies have a sweet floral flavor from the wine and lavender. I rolled the unbaked cookies in turbinado sugar to give them a little texture and extra sweetness. These cookies are PERFECT with a mug of hot tea or coffee (OK, they are pretty good with the leftover wine from the recipe too)!


LESSON LEARNED: Sometimes seemingly "odd" combinations of ingredients work well together!

Recipe for Sweet Wine & Lavender Shortbread

Monday, September 26, 2011

Lesson #15: Adventures in Truffle Making - part 1

While my husband and I lived in Arizona, we LOVED See's Candy. These stores are mostly on the west coast - although you can find mini stores in some airports and in the mall around Christmas time - and they have fabulous candy which you can (and we do!) order online. See's carries a wide variety of chocolate truffles, so I thought I try making them.

Well, my first attempt kinda worked... First, and foremost, the flavor on these creamy lemon truffles in fantastic. They have a semi-sweet chocolate coating with a creamy, melt-in-your-mouth white chocolate ganache. The white chocolate is dotted with lemon zest which provides just enough acid to cut the sweetness of the chocolate. That's the good news!

The bad news is that my technique needs work. Unlike what I imagine a pastry chef would do, I didn't temper the chocolate. This is basically where you melt the chocolate and then bring it up to a certain temperature by adding some unmelted chocolate. From what I understand, tempering chocolate allows the chocolate to properly set and gives in a satin smooth finish. Second, my dipping technique was a little messy. There are globs of chocolate on top and they don't look very pretty at all.

But, man, these are good! I threw them in the freezer and pull one out every once in a while for a treat. I decided that I'm going to keep on working on making truffles. I'll keep you posted :)


LESSON LEARNED: Truffles are delicious, but I need some practice making them!

Recipe for Creamy Lemon Truffles

Saturday, September 24, 2011

Lesson #14: Mini Bananas Foster Cheesecake

I saw this recipe in a dessert booked I checked out from the library and thought these mini cheesecakes were super cute. The cheesecake is full of bananas & rum on top of a nutty, cinnamon graham cracker crust. The mini cheesecakes are then covered with sliced banana and caramel sauce.

Usually, when I have a craving for cheesecake, I end up making a whole cheesecake which is really too much for the two people in our household to eat. Cheesecake isn't the easiest thing to share with people (especially because we don't know too many people in the town where we live), so we never eat the whole thing. I was happy to see this idea for mini cheesecakes and it seemed like a yummy flavor to make. This dessert definitely satisfied my cheesecake craving and - as a bonus - they didn't take too long to bake.

There were a couple of things that I learned while making these cheesecakes. First, it's better to use mini cupcake liners because they come out of the pan MUCH easier and there is less of a mess. Second, this dessert is WAY better the on the same day you make it and doesn't keep very well after a day or so. Overall, these are very good and did remind me of the traditional bananas foster dessert!


LESSON LEARNED: Mini cheesecakes are the perfect size to get your cheesecake "fix".

Recipe for Mini Bananas Foster Cheesecake 

Thursday, September 22, 2011

Lesson #13: Peanut Butter Sandwich Cookies

If you like peanut butter, you'll LOVE these cookies. I shared these cookies with some of my classes yesterday and they were well received - hopefully at least as well as my lecture! :)

I've made them a few times and learned a few things along the way. First, and this may seem like common sense, you want round cookies when you make sandwich cookies. The first time I made these I started to roll the dough into balls and it was WAY too sticky to roll into balls. It works best if you refrigerate the dough for at least an hour. Yes, this adds an extra step, but it's definitely worth it (at least for presentation).

Second, the filling for these cookies is AMAZING! It's light and fluffy with tons of peanut butter flavor. However, I would not advise you to walk away from the filling when it's mixing. I went to our basement to look for a container to package the cookies and the filling went from light & fluffy to thick & chunky. That's not what you want in this cookie. I found that if you added more powdered sugar and milk, the filling goes back to light & fluffy. So, I learned to solve two problems by making this cookie, but don't forget that these cookies are absolutely delicious!


LESSON LEARNED: Refrigerating dough makes cookies at lot easier to shape!

Recipe for Peanut Butter Sandwich Cookies

Wednesday, September 21, 2011

Lesson #12: Cinnamon Sugar "Toast" Cupcakes

When I was growing up, one of my favorite ways to eat toast was buttering it and then sprinkling a mixture of cinnamon and sugar on top. In fact, I still prefer to eat toast this way! So, when I came across a recipe for a cinnamon sugar cupcake, I had to try it.

This is a buttery yellow cake and the frosting really packs a cinnamon sugar punch. The consistency of the frosting is a mixture of a traditional powdered sugar/butter frosting and a whipped cream frosting, so it's sweet but also light. I think I might have let my butter get too soft when preparing the frosting, but it works in this cupcake because you can really taste a butter flavor. I garnished the cupcakes with a little caramel sauce, but pieces of cinnamon toast crunch cereal would also be great and give the cupcake a little bit of texture. This cupcake really does taste like eating a piece of cinnamon sugar toast!


LESSON LEARNED: This breakfast flavored cupcake is just as good as the original inspiration!

Recipe for Cinnamon Sugar "Toast" Cupcakes

Monday, September 19, 2011

Lesson #11: Roasted Apple Ice Cream

Last weekend, my husband requested apple ice cream. He tried one of my roasted apple cupcakes and thought it would be good as an ice cream flavor. His idea was great! I roasted apples in the oven with a touch of brown sugar, cinnamon, and nutmeg until they were soft. Then, I made my vanilla ice cream base and during the last few minutes of churning, I added the apples (after they were cool, of course!). This ice cream tasted like fall and is even better with a bit of caramel sauce drizzled over the top! :)


LESSON LEARNED: Apple ice cream is yum-o!

Sunday, September 18, 2011

Lesson #10: Brown Sugar Pots de Creme with Caramel Sauce

When I was reading my Food & Wine magazine last month, I cut out a recipe for Butterscotch Pots de Creme. I LOVE the buttery, caramel taste of butterscotch, so I thought I would try this recipe. If you notice, however, the title of this recipe doesn't have butterscotch in it. Let me tell you why! :)

Well, as I started to gather ingredients, I noticed the recipe called for dark brown sugar and I only had light brown sugar. I know you can add molasses to brown sugar to make it "darker", but I only had a little time to make this dessert and I didn't want to take the extra step. Next, in the first step of the recipe, you melt butter and add the brown sugar and cook it until it becomes bubbly. This is what should give the dish a butterscotch flavor. I must have not cooked the sugar enough in this stage because the end result was did not look like the picture and there was not a pronounced butterscotch flavor.

Even with these potential mishaps, these desserts were amazing! The custards were extremely creamy and had a molasses, brown sugar flavor. The caramel sauce on top reinforced the nutty flavor of the dessert. Topped with a little extra whipped cream, these desserts were better than your average restaurant dessert!


LESSON LEARNED: Cook brown sugar longer to get a butterscotch flavor!

Recipe for Brown Sugar Pots de Creme with Caramel Sauce

Thursday, September 15, 2011

Lesson #9: Roasted Apple Cupcakes with Apple-Cinnamon Frosting

Over the last few weeks I've made a ton of baked goods to send to a bridal shower in Wisconsin. The last thing on the menu was an apple cupcake. We just started to get locally grown apples at the grocery store, so I was super excited to come up with a recipe! First, I decided to roast the apples in the oven to make sure they cooked in enough time since I was making mini cupcakes. Who wants crunchy apples in a cupcake? :)

As I was making the cupcakes, I was deciding which type of frosting would go best with these cupcakes. At first, I thought I would make a caramel buttercream, but I noticed that when I roasted the apples, they released some of their juices which created an apple syrup. I thought that would be the perfect addition to the frosting and - viola - I came up with apple-cinnamon frosting!

These cupcakes have a rich, buttery taste with diced cinnamon apples. The frosting is wonderfully light and fluffy and flavored with the liquid from the roasted apples. They are super yummy!


LESSON LEARNED: Apple-cinnamon syrup makes an awesome addition to frosting!

 Recipe for Roasted Apple Cupcakes with Apple-Cinnamon Frosting

Wednesday, September 14, 2011

Lesson #8: Salted Cashew Caramel Cookies

Yesterday, I was in the mood for a sweet & salty cookie. I found a recipe for salted cashew caramel cookies and it completely satisfied my craving. I was a little skeptical when I first read the recipe. First, there was no leavener (e.g. baking soda or powder) and you had to take out the cookies halfway through, flatten them, and return them to the oven. I thought there were two possible ways this would go (which has happened to me before!): (1) my cookies would be completely flat or (2) they would be as hard as a rock. Surprisingly,  this flattening method worked well (I used the back of a measuring cup) and the cookies were tender and soft. The second reason I was concerned was that the recipe called for a lot of cashews (2 1/2 cups!). I thought the cashew flavor might be too overwhelming. However, to make the cookies, you take a 1 1/2 cups of the cashews (with some oil) and create a cashew butter in a food processor. Then, at the end, you mix in the rest of the chopped cashews. Again, I was surprised! The cookies definitely tasted like cashews, but they also had a rich buttery flavor. Complemented by the sweet caramel drizzle on top, these cookies are fantastic!


LESSON LEARNED: Don't be afraid of different cookie baking techniques!

Recipe for Salted Cashew Caramel Cookies

Tuesday, September 13, 2011

Lesson #7: Pavlovas with Orange Curd

When I received my Food & Wine magazine for September, I was completely enthralled by a dessert that at first glance looked exactly like an egg. I thought it was a really neat idea to present a meringue (i.e. baked, sweetened whipped egg whites) and curd (i.e. custard - usually containing citrus) dessert. Yesterday, I thought I would give it a shot because I had a few hours between the two classes I teach on Monday. Surprisingly, it wasn't very time consuming - at least with the hands on time because the meringues take an hour to bake - AND I didn't even get my dress clothes messy. :)

When we tried it last night after dinner, it was excellent! The meringues were a bit crunchy on the outside and slightly chewy in the center and when you mixed it with the curd, the citrus cut some of the sweetness of the meringue. Check it out below!


Recipe for Pavlovas with Orange Curd

LESSON LEARNED: Even fancy looking desserts can be whipped up in no time!


Sunday, September 11, 2011

Lesson #6: Butterfinger Ice Cream

Now that I've improved on my ice cream making skills, I've been experimenting with different flavors. Last week, I made mint Oreo ice cream by adding mint extract and crushed Oreos to my vanilla ice cream base. The ice cream flavor for this week is Butterfinger ice cream! I mixed up my favorite recipe for ice cream, let it chill in the refrigerator for a couple of hours, started my ice cream maker, and in the last few minutes of churning, added 5 "fun size" crushed Butterfinger candy bars. The crushed candy bars really incorporated well into the ice cream. It's important to let the ice cream chill in the freezer for at least a couple of hours. This will firm up the ice cream and let the Butterfinger flavor really intensify. You might be able to tell from this picture that I did not freeze it long enough and it immediately started to melt! It still tasted good and I'm sure it will taste even better tomorrow :)


LESSON LEARNED: Chill ice cream in the freezer for at least a few hours before you eat it!

Friday, September 9, 2011

Lesson #5: Adventures with Royal Icing

I have been working on my sugar cookie decorating skills for a while. There are two different camps to decorating sugar cookies: plopping on a glob of butter cream frosting  or meticulously outlining and thinning royal icing to achieve the perfect smooth finish. For a while, I thought I wasn't that detail oriented of a person to go through the process of using royal icing. I'm usually perfectly happy to get a nice sugar cookie with a dab of frosting. I thought, however, I would like to try to improve my decorating skills and to see how much patience I had when it comes to decorating. In case you are interested, the steps to making these cookies are (1) make the dough, (2) roll, cut and bake the dough, (3) make royal icing, (4) tint and thin the icing just enough to be able to pipe an outline around the edge of a cookie, (5) wait, (6) thin the icing and "flood" the cookie, (7) wait again, and (8) finally enjoy the cookie (of course, unless you want to add more details using the thicker frosting you made in step four)!

The first time I attempted to use royal icing to decorate cookies, the whole process took 5 hours of work (not including any waiting time) and the end result didn't come close to the picture perfect cookies I imagined. After a few rounds of practicing, I've gotten better, but I could still use more practice. The important thing, however, is that the cookies taste good. You would hate to put in all the work and not enjoy the cookies in the end, right?


LESSON LEARNED: Decorating with royal icing can be tricky, but if you practice at it, you will get better!

Recipe for my favorite cutout sugar cookies 

Wednesday, September 7, 2011

Lesson #4: Chocolate Chai Tea Cupcakes

Cupcakes seem to be one of my "go-to" desserts. They take less time to make and I can easily give them away to people (at least compared to a slice of cake). This weekend, I thought I would try a new technique for infusing flavors into my cupcakes. I wanted to create a chai tea cupcake for my friend Jess (who LOVES chai tea!). I was inspired by combining the recipes for a chocolate spice cake with a chai pot de creme (think creme brulee without the sugary crust).

I used two different techniques with resulted in this light and airy, yet delightfully spicy, chocolate cupcake. First, I warmed milk with chai teabags, a stick of cinnamon, and a few cardamon pods and whole cloves and let this steep for about an hour. I then incorporated this milk into the cake batter. Second, after I mixed up the cupcakes, I folded in whipped egg whites right before baking. This makes the texture of the cupcake very light and avoids dense, "muffin-like" cupcakes. As long as I have the time, I use this egg white technique every time I make cakes. Enjoy!


LESSON LEARNED: One way to infuse flavor into a cake is to steep the milk used in the batter.


Recipe for Chocolate Chai Tea Cupcakes

Sunday, September 4, 2011

Lesson #3: Cinnamon French Toast Cupcakes

On Friday, I decided to surprise my husband by making French toast for breakfast. We had some leftover sourdough bread from the week (I've been making my own sourdough starter for the last three weeks by "feeding and watering" it everyday....but that's story for another post!), so I cut into pretty thick slices, dunked into into my egg/milk/brown sugar batter, and sauteed it in some butter. Well, I think I cut the slices too thick and the egg didn't soak into the bread, so it didn't quite turn out. It was a poor excuse for French toast.

Later that day, I thought I could redeem my baking skills for the day and transform my French toast Flavors into a cupcake. The end result was a cinnamon cupcake with a sweet (yet slightly tangy) maple cream cheese frosting. They were WAY better than my first attempt and, honestly, who wouldn't want to eat a cupcake for breakfast?


LESSON LEARNED: Cinnamon french toast is a yummy cupcake flavor!


Recipe for Cinnamon French Toast Cupcakes


Friday, September 2, 2011

Lesson #2: Perfect Peach Pies

The last time I made peach pie I had amazing, in-season, juicy ripe peaches. I used my favorite recipe for pie crust, skinned and sliced the peaches, added sugar and a touch of flour and put it in the oven. About 45 minutes later, the crust was nice and brown and the pie smelled wonderful. I set it out to cool and a few hours later I sliced into it. What I found, instead of a picture perfect slice of pie, was a mess of overcooked peaches and runny (slightly raw flour-y) tasting syrup. What went wrong?

I thought maybe my method of tossing everything together (similar to what I do when I make apple pie) was not the best way to make a perfect peach pie. I knew I wanted to syrup in the pie to be thick and luscious and the peaches to maintain a little bite and their naturally juiciness. After some research, I came up with a recipe for Vanilla Scented Mini Peach Pies.

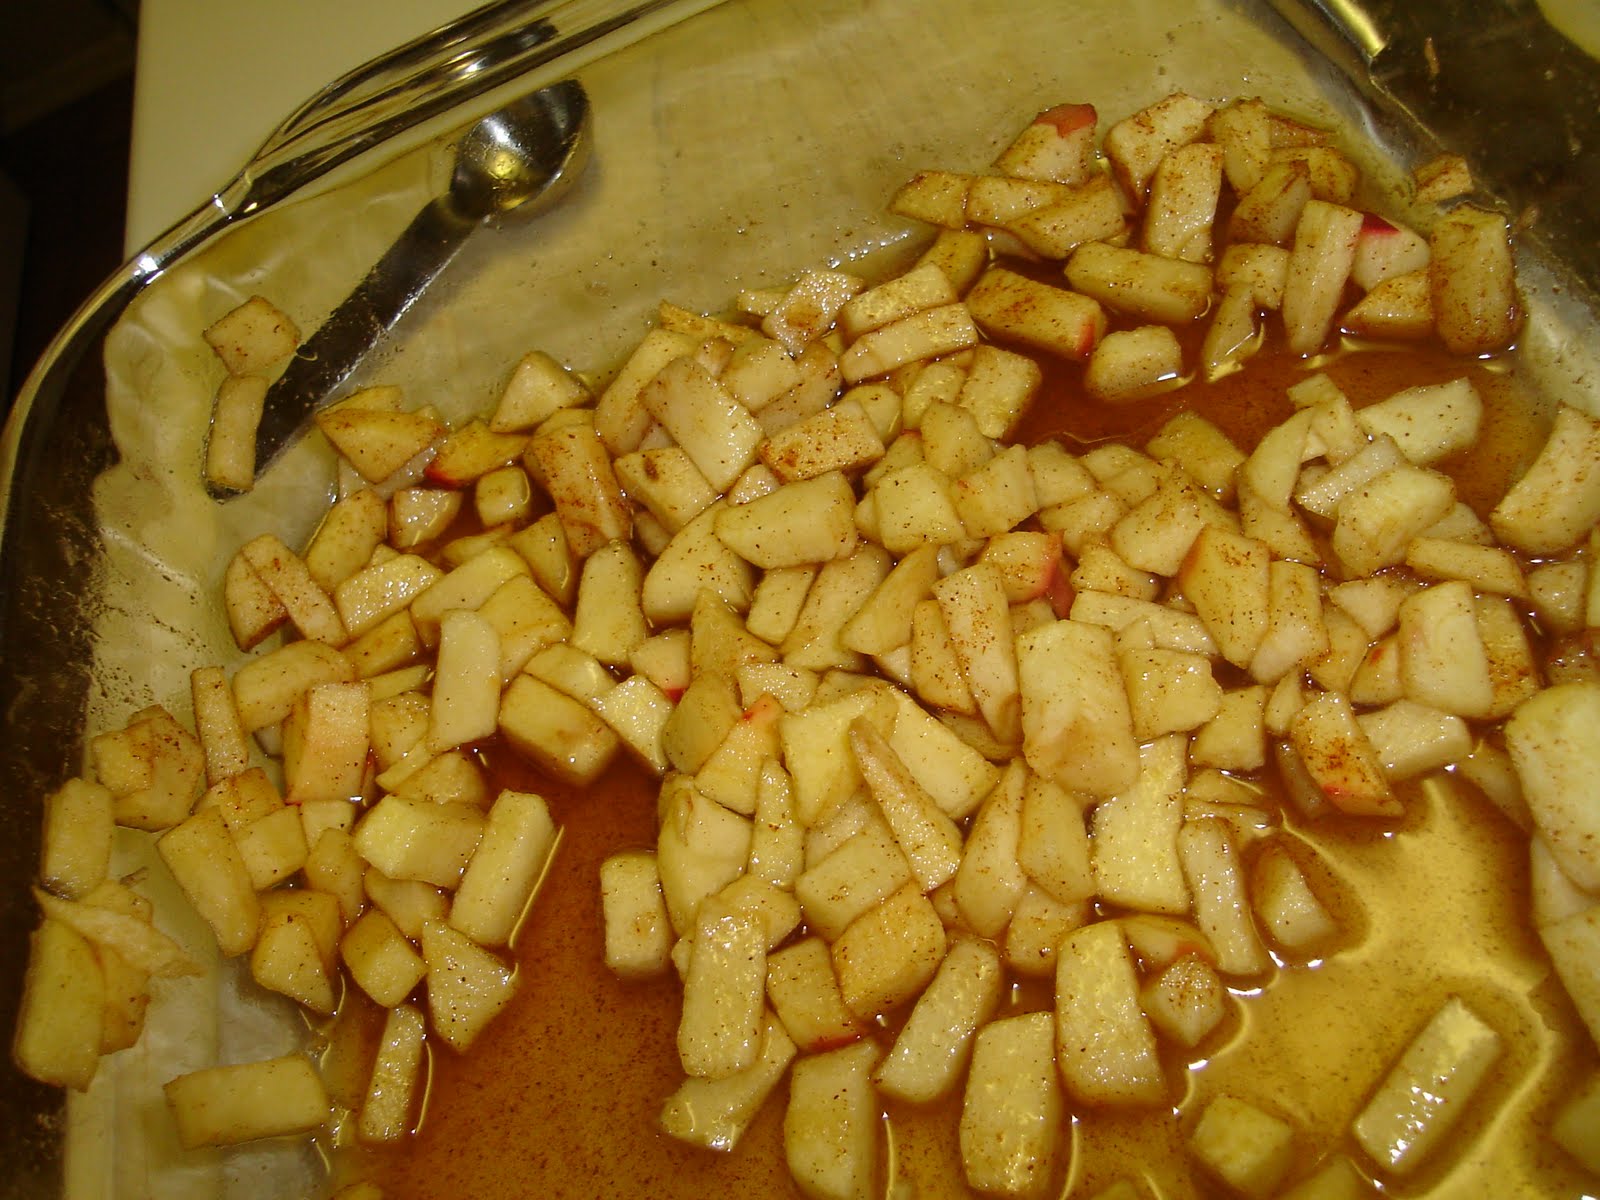
First, instead of tossing all the filling ingredients together, I let the fruit sit (or macerate) with sugar, flour, and a touch of nutmeg. Then I heated the resulting syrup in a saucepan until it was thick and mixed in the peaches at the last second. Second, I made mini pies using a mini-cupcake pan and lined the pan with liners for easy clean up. I was also able to cook the pies in a shorter time which lead to the peaches not being overcooked. Third, to give these mini pies something a little extra special, I used vanilla sugar which I always have in my pantry. I take my leftover vanilla bean pods (after I've scraped out the seeds) and stick them in an airtight container of granulated sugar. When you bake these pies, the house begins to smell like vanilla scented peaches - it's wonderful!


Recipe for Vanilla Scented Mini Peach Pies

LESSON LEARNED: Allowing the peaches to release their natural juices and cooking the syrup results in a thick pie filling. By adding the peaches after this process and shortening the baking time, keeps the peaches from being overcooked.

Related Posts Plugin for WordPress, Blogger...